Intro to WildFly
Last time I had worked with JBoss, 2 to 3 yrs back, it was JBoss 7. Recently I got a chance to work with JBoss for some EJB stuff. But to my curiosity, it is no more JBoss now. Rather it has got an incarnation in the form of WildFly. While writing this blog, WildFly 10.1 is the latest release.
So today I will show you how to write and run EJB 3 program in Eclipse using WildFly server.
Example
We will create a remote stateless EJB that will take a user's name and return a string addressing that user as Hello User!!! Let us get started.
Softwares / Tools
- EJB 3.2
- WildFly 10.0.0.Final
- JDK 8
- Eclipse Neon 4.6.1
Steps
- Download WildFly 10.0.0.Final in your machine and configure it as one of the servers in Eclipse Neon.
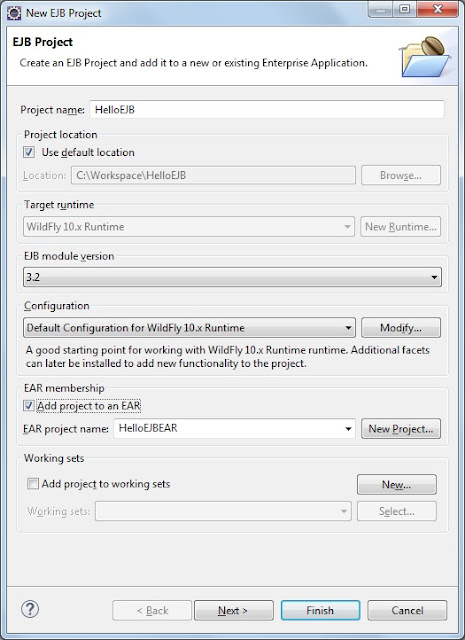
- In eclipse, create an EJB Project by selecting File -> New -> EJB Project. It will open the following dialog box.
 |
| Creating EJB Project |
Enter 'HelloEJB' as the Project Name. Since we want to deploy this EJB as part of an EAR, let us tick 'Add project to an EAR' checkbox. Enter EAR project name as 'HelloEJBEAR'. Click 'Next' button.
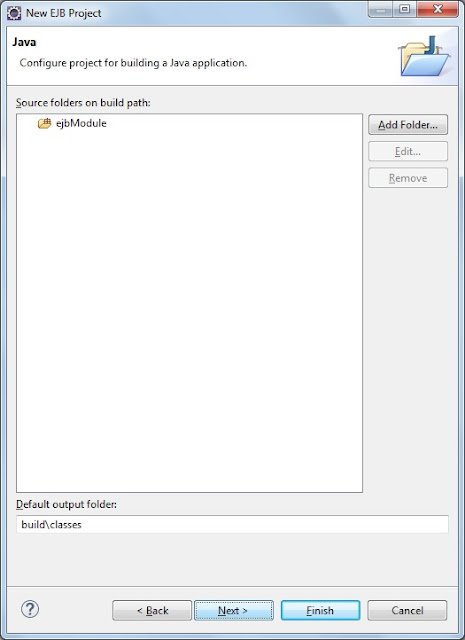
- Next dialog box will ask you Source and Output folders. Leave the defaults unchanged. Click 'Next' button.
 |
| Adding Source Folder for EJB Project |
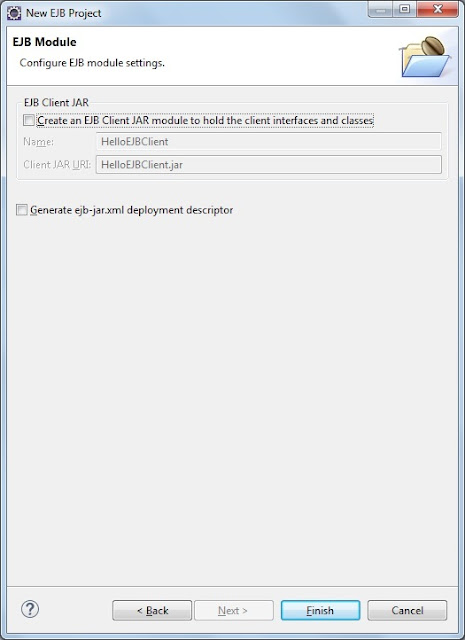
- This dialog box asks if you want to create an EJB client JAR. It should be checked if you want your EJB and its clients to share some common classes like interfaces and utility programs. As I want to keep it simple, don't check anything here. Click 'Finish' button.
 |
| Creating EJB Client Project |
- Once you come back to Eclipse workspace, you will find 2 projects being created for you. One is 'HelloEJB', an EJB project and other one is 'HelloEJBEAR', an EAR project. The structure of both the projects should be similar to that shown in the screenshot below.
 |
| EJB, EAR and Client Project Structure |
- Now let us write our first enterprise bean. Following is the code for interface of our remote stateless bean.
public interface IHelloBean {
String sayHello(String name);
}
- Next is EJB class. Mark how easy it is to create an enterprise bean class using EJB 3 with POJO and few annotations.
import javax.ejb.Remote;
import javax.ejb.Stateless;
@Stateless(mappedName = "HelloBean")
@Remote
public class HelloBean implements IHelloBean {
@Override
public String sayHello(String name) {
return "Hello, "+name;
}
}
- Now we have to create a client class to invoke this remote EJB. Eclipse provides Application Client Project for such scenarios where we want to have our own client that will invoke EJB or some Java Enterprise stuff. So create a new Application Client Project by selecting File -> New -> Application Client Project. Give the project name as 'AppClient'. It will create a new project in your workspace with similar structure as shown in the previous figure.
- Ensure the project HelloEJB is imported and jboss-client.jar is there in the classpath of our AppClient project.
- Following is the client class to invoke HelloEJB.
import java.util.Properties;
import javax.naming.Context;
import javax.naming.InitialContext;
import javax.naming.NamingException;
import com.programnplay.ejb.IHelloBean;
public class RemoteClient {
public static void main(String[] args) {
try{
Properties properties = new Properties(); properties.put(Context.INITIAL_CONTEXT_FACTORY,"org.jboss.naming.remote.client.InitialContextFactory");
properties.put(Context.URL_PKG_PREFIXES, "org.jboss.ejb.client.naming");
properties.put(Context.PROVIDER_URL, "http-remoting://localhost:8080");
Context context = new InitialContext(properties);
String ejbString = "ejb:HelloEJBEAR/HelloEJB/HelloBean!com.programnplay.ejb.IHelloBean";
IHelloBean remote = (IHelloBean)context.lookup(ejbString);
String str = remote.sayHello("Rajiba");
System.out.println(str);
}catch (NamingException nme) {
System.out.println("NamingException is caught. Please check your initial context and lookup.");
}
}
}
As you can see, we have to create an InitialContext using a Properties object. Then we have to lookup EJB by passing an ejbString. It follows the below convention.
ejb:<app-name>/<module-name>/<distinct-name>/<bean-name>!<fully-qualified-classname-of-interface>
If it is a stateful bean, we just need to add "?stateful" at the end of above string.
- To make the client run, we should create a properties file named jboss-ejb-client.properties with the contents shown below and place it in the root of source folder.
remote.connection.default.host=localhost
remote.connection.default.port=8080
remote.connection.default.username=user
remote.connection.default.password=Password
Last two entries are required if and only if client invokes EJB from remote host and it has to be authenticated by EJB server i.e., application server where EJB resides.
- Code wise we are almost done. Let us deploy and run. First is deploying EJB. For this we have to deploy HelloEJBEAR. Go to server view of eclipse and there add HelloEJBEAR to WildFly server you have already configured in step 1. Then start your server. Below is given server console.
 |
| Server Console |
- Now run the client program RemoteClient by right clicking on it and selecting Run As -> Java Application. Below is client output.
 |
| Client Console |
In the output console, we can clearly see 'Hello Rajiba' which is passed by HelloEJB that is invoked through the client.
Hope this post will help readers, both new as well as old JBoss users like me, get going with WildFly.
No comments:
Post a Comment